A new reader survey shows a decisive trend in how Android users stop intrusive ads. Private DNS emerged as the clear favorite, with 65% of respondents choosing it as their primary method for ad blocking. Fewer than 19% said they rely on third-party apps, while a small remainder reported using no blocking at all.
Why Private DNS Tops the List for Android Ad Blocking
The appeal is straightforward: Private DNS is built into Android 9 and newer, requires no root access, and works system-wide without the battery or performance hit of a perpetual VPN tunnel. Configure a provider once and every app benefits from domain-level filtering.
- Why Private DNS Tops the List for Android Ad Blocking
- How It Compares to Ad-Blocking Apps and Browsers
- What DNS Blocking Can and Cannot Do on Android
- Adoption Signals and the Current Industry Context
- Practical Private DNS Setup Tips for Android Users
- Bottom Line: Why Private DNS Is the Top Choice on Android
Services such as Cloudflare’s 1.1.1.1 are well-known for privacy and speed, but ad-focused options like AdGuard DNS and NextDNS add curated blocklists for advertising, tracking, and malicious domains. Users can also enable categories to screen scam sites or adult content—capabilities typically reserved for more complex security suites.
Another practical edge: Private DNS does not interfere with features that can be sensitive to VPNs, such as Android Auto. That makes it attractive for commuters and anyone who relies on connected car integrations, where stability often trumps tinkering.
How It Compares to Ad-Blocking Apps and Browsers
Third-party ad-blocking apps, including those that create a local VPN to filter traffic (e.g., Blokada-style solutions), offer granular control and per-app rules. They can excel in edge cases, especially for users who want detailed analytics or custom filters. Some readers report these apps play nicely with enterprise apps, an important factor if your device is managed under a work profile.
Browser-based blocking remains a strong complementary option. Firefox supports robust extensions like uBlock Origin, Brave ships with built-in shields, and Samsung Internet allows content blockers that are effective on the mobile web. The catch is scope: browser blockers won’t touch in-app ads inside games or streaming apps, where many of the most annoying ad experiences live.
What DNS Blocking Can and Cannot Do on Android
DNS filtering stops connections to known ad and tracking domains before they resolve, which is lightweight and fast. But it is not a silver bullet. Apps that serve ads from the same domain as their core content—YouTube is a common example—are notoriously difficult to filter without breaking functionality. Some apps also embed their own encrypted DNS requests that can bypass system settings.
There are operational quirks, too. Captive portals on public Wi-Fi can fail when Private DNS is enabled; temporarily switching to Automatic DNS typically fixes the login page. False positives can crop up if a blocklist grows too aggressive, so reputable providers that quickly adjust their lists are worth prioritizing.
It is also worth noting what Private DNS is not. It does not hide your IP address from websites, and it does not function like a full VPN. It encrypts DNS lookups (via DNS-over-TLS), reducing ISP or network-level snooping of the domains you query, but broader privacy still requires a VPN—and running both may demand careful configuration to avoid conflicts.
Adoption Signals and the Current Industry Context
The 65% figure underscores how mainstream network-level ad blocking has become on Android. Frustration with intrusive formats has grown for years, and the Coalition for Better Ads has pushed publishers toward less disruptive experiences. Meanwhile, platform policies limit system-wide ad blockers, nudging users toward acceptable, OS-supported methods like DNS filtering and browser tools.
Google’s mobile browser already filters egregiously abusive ads, but that safeguard is far from a comprehensive blocker. As a result, many users are assembling a layered approach: Private DNS for system-wide coverage, plus a privacy-focused browser for the web, and selective use of app-based blockers where needed.
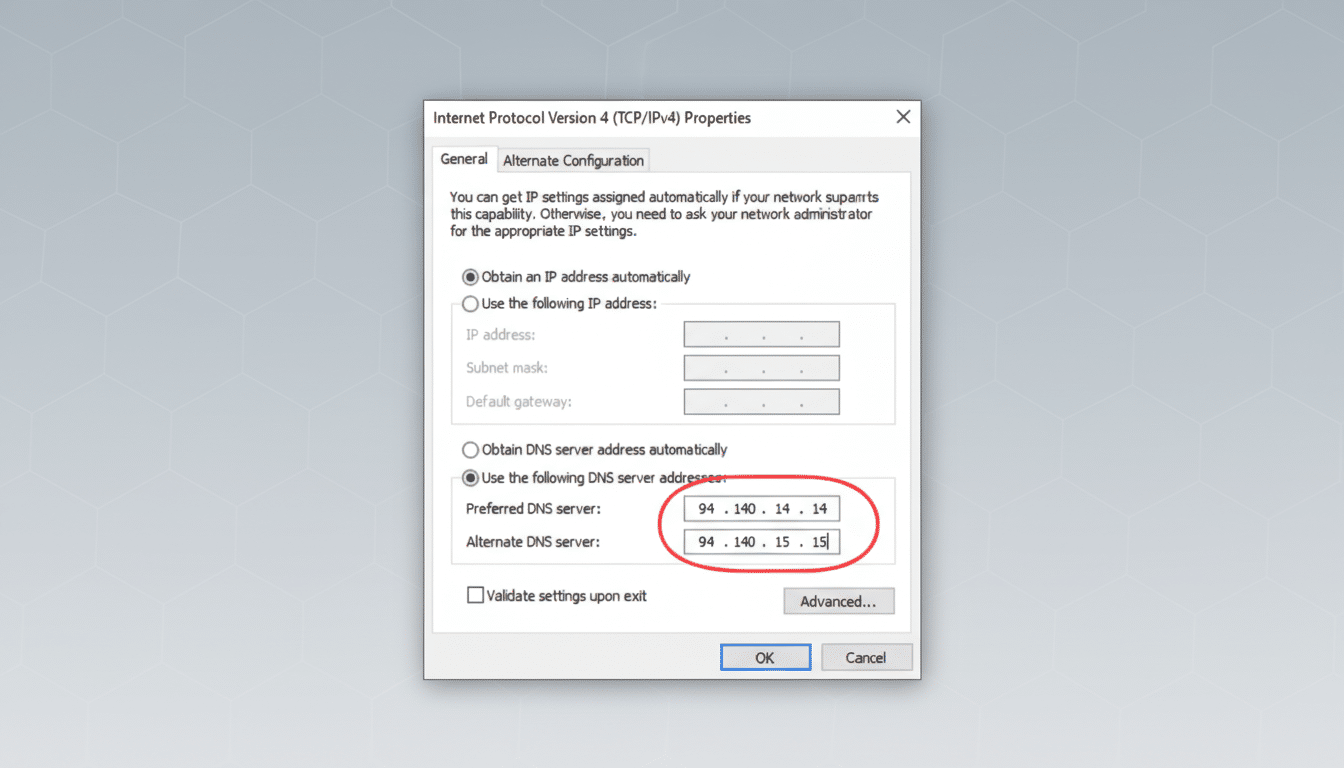
Practical Private DNS Setup Tips for Android Users
On most devices, you can enable Private DNS by going to Settings, then Network and Internet, then Private DNS. Select the option to specify a provider hostname and enter one from a trusted service (for example, AdGuard’s DoT hostname or a personalized NextDNS hostname). Samsung devices may list this under Connections and More Connection Settings.
After applying the setting, confirm by visiting your provider’s test page or checking their app for a “connected” status. If a network login page will not load, temporarily switch Private DNS to Automatic, complete the sign-in, and then re-enable your provider hostname.
Bottom Line: Why Private DNS Is the Top Choice on Android
With 65% of surveyed users favoring Private DNS, the consensus is clear: DNS-level filtering currently offers the best balance of simplicity, performance, and coverage on Android. Dedicated apps and hardened browsers still have a place, but for most people, a reputable Private DNS provider is the most reliable way to cut down the noise without compromising everyday functionality.