It is easy to lose the photos in your iPhone and difficult to retrieve them. A single swipe during album cleaning, a failed iOS upgrade, or a hitch in the iCloud synchronisation, any of these may cause the transfer of pictures to vanish within seconds. The silver lining: photos you have deleted do not necessarily disappear forever. iOS retains recently deleted photos, and there are numerous ways to recover them, including one-tap (or less) recovery options provided by Photos by default, complete device restores, and third-party recovery programs.
This post takes us through three workable methods in order of their simplicity. It also talks about the time when each method is appropriate, and why it is better to act fast and increase the likelihood of recovering files. In case you have just found an absent picture, then read, as fast as you can, because the quicker the better.
Method 1: Check the “Recently Deleted” album
The first thing you should check, before you proceed with something technical, is the obvious one: Photos, Albums, and Recently Deleted.
When you delete a photo on an iPhone, it usually switches to the Recently Deleted album and will remain there for 30 days. At the same time, you can rebuild things without any additional software. The steps are simple:
- Open the Photos app.
- Tap Albums, tap Recently deleted.
- Select Tap, select the photos, and tap Recover.
Appropriate situations: someone deleting images in the album cleaning, clicking the wrong taps, or even when you remove some pictures and immediately realize it.
Inapplicable cases: we cannot recover deleted photos older than 30 days, we cannot recover deleted photos that have been deleted by a third-party application or an error, or purge an album with an automatic cleanup tool. Moreover, in case you had deleted files one by one, you will have to engage in using other mechanisms.
Tips: when you notice the pictures in the Recently Deleted section, save them as soon as possible and then make a new backup (iCloud or local) in order to avoid such a scenario.
Method 2: Restore via iCloud or iTunes/Finder backups
When the Recently Deleted album is empty, the second option is the official way to go; checkbackups. Apple approaches are efficient but crude: the recovery of an iCloud backup or an iTunes/Finder backup will restore the whole state of the device, as it was at the time the backup was done. This approach is often used to recover deleted photos from iPhone, but it comes with trade-offs. Any data added after the backup will be overwritten.
What you need to know:
- iCloud: In case your iPhone had a backup when you still had the photos on it, this device can be restocked by the backup. This can be done by going to Settings, General transfer or Reset iPhone, and erase all contents and settings, followed by restoring during setup via iCloud.
- iTunes/Finder: In case you are backing up to a computer, you can follow these steps to restore the backup: connect your iPhone to a computer and then restore the backup in Finder (macOS Catalina and beyond) or iTunes (old macOS/Windows).
- Backup requirements: You must already have a backup that was done when the photos were still there. Stored passwords and Health data will be encrypted in the backup; not all will be available in unencrypted ones.
Limitations: a full-device restore overwrites more recent content. It does not suit well when you just need a few photos and do not care about losing messages, apps, and other files that were added after the backup. Due to this reason, some users would be satisfied with specialized recovery software that would extract certain objects from the backups without destroying the device.
In case you are hesitant to delete your phone and the backup method seems too cumbersome, there exist third-party solutions that is to scan backups or iCloud snapshots and allow you to choose what pictures to save, without restoring them completely. The current space includes one of the most practical alternatives that will allow users to extract various images and other media, choose to do it selectively and securely; it may be used in cases when the common restore route is too disruptive.
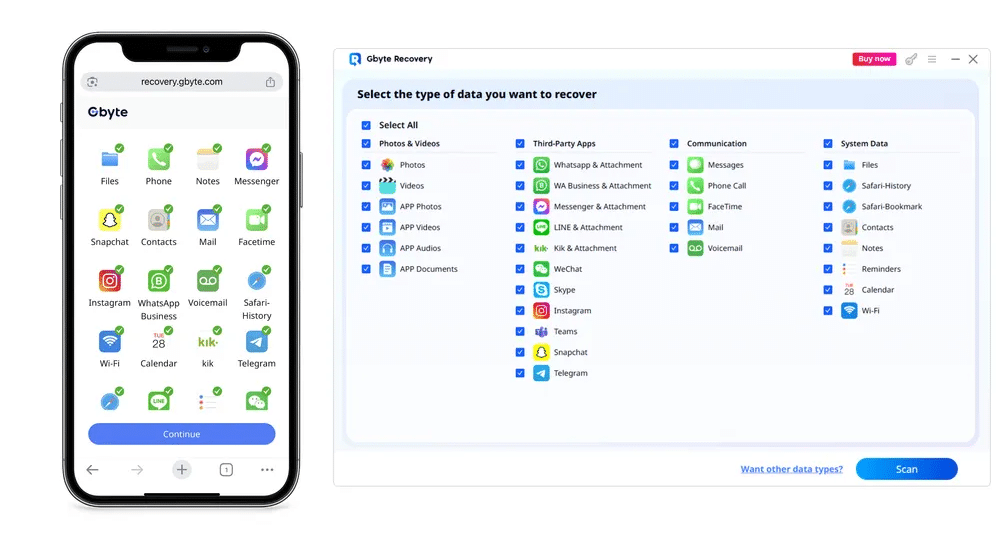
Method 3: Restore using a third-party tool, Gbyte Recovery
In some cases, a recovery utility may prove a valuable substitute for the official paths. These utilities are meant to search through storage on devices, iTunes/Finder backups, and iCloud snapshots to find the hidden photos on the phone. They also allow you to preview what can be recovered, and only restore what you want, preventing the full-overwrite issue of a device.
General advantages of third-party recovery tools:
- Targeted extraction from backups (no need to erase the device)
- Preview function so you can confirm what will be recovered
- Support for a range of file types beyond photos (messages, contacts, attachments)
General caveats:
- Success varies with how much new data has been written since deletion the more you use the device after losing files, the lower the chance of full recovery.
- Use reputable software from known vendors and avoid tools that request unnecessary permissions or payment before a free scan.
- Keep expectations realistic: if data has been fully overwritten, recovery may be impossible.
How to use Gbyte Recovery (practical steps)
The following is an unbiased, non-marketing walkthrough of the sort of procedures that you may anticipate when utilizing a third-party tool like Gbyte Recovery. Precise menu and text differ depending on the version, but the basic procedure is uniform across tools.
- Prepare your environment: To prevent overwriting data that is deleted, stop using the iPhone to perform non-essential activities. Assuming there is a chance, place the device in Airplane mode.
- Install and determine the desktop application: The majority of recovery products are based on macOS or Windows. The installer follows and opens the program.
- Sign In With Apple ID: Scan and recover data by signing in with your Apple ID on a computer, or use the web version directly on your iPhone, no physical connection required.
- Choose a scan mode: The common options are to scan the device itself, scan an iTunes/Finder backup, and scan iCloud. Choose the option that best fits.
- Run a scan: Allow the software to analyze the storage or backup. It can also take several minutes due to the size of the data.
- Preview results: Browse found photos and choose what exactly you want to bring back. The preview minimizes the chances of restoring useless files.
- Recover selected items: Send them to your computer or transfer them to the device if the tool has this option. Copy saved files in a secure place and make another backup.
In case you add pictures to your notes or a how-to post, take screenshots of the scan and preview screens to make each step understandable to the readers. The screenshots assist readers in not having to guess their way through.
Conclusion
For deleted photos, check the Recently Deleted album, the presence of an official backup of your pictures, and in the event that these methods fail, you may want to adopt a dedicated recovery program such as Gbyte Recovery. There are trade-offs between safety, convenience, and completeness with each of the methods, and depending on the manner of deletion occurrence and the amount of data that you can spare to overwrite.