How to Recover Emptied Trash on Mac and Restore Deleted Files Easily
You emptied the Trash on your Mac by mistake. With a sinking heart, you realize you forgot to restore a critical file you needed later. But that’s not the only reason files can get deleted from Trash. However, the biggest concern here is whether you can recover Trash on Mac. Stop using your Mac immediately and read this guide to learn whether recovery is possible and, if so, how!
Key Takeaways
- Emptying Trash doesn’t instantly erase files, but modern SSDs (with TRIM) can permanently remove them quickly, so speed matters.
- You can recover files using Time Machine or iCloud if backups were set up before deletion.
- If no backup exists, 4DDiG Mac Data Recovery can help recover deleted files with high success.
- Built-in options like Undo or Terminal rarely work, especially on newer Macs.
- The best protection is regular backups (3-2-1 rule) and careful Trash use to avoid data loss.
Part 1: What Happens When You Empty Trash on Mac
When you drag a file to the Trash and then empty it, macOS marks that storage space as “available.” But it doesn’t immediately erase the underlying data. So, your chance for Mac data recovery after empty Trash is still there. But you need to act quickly. Here’s why files disappear from Trash:
- Key Takeaways
- Part 1: What Happens When You Empty Trash on Mac
- Part 2: Can You Recover Emptied Trash on Mac?
- Part 3: How to Recover Emptied Trash on Mac (Step-by-Step)
- Method 1: Restore from Time Machine Backup
- Method 2: Check Cloud Storage (iCloud/Drive)
- Method 3: Recover Emptied Trash Using Data Recovery Software (Most Effective)
- Method 4: Try Terminal (Limited Use)
- Part 4: How to Prevent Data Loss on Mac
- Final Words
- FAQs
- Accidental “Empty Trash”: Clicking the menu option or right-clicking the Trash icon.
- Keyboard shortcut: Pressing “Option + Command + Delete” permanently deletes without using the Trash at all.
- Auto-cleanup: macOS Ventura, Sonoma, Sequoia, and Tahoe all include a setting that automatically empties the Trash after 30 days. Many users turn this on and forget about it.
- External drive deletions. Files deleted from connected external drives go to their own hidden “.Trashes” folder. If the drive is ejected before recovery, those files may be harder to find.
Part 2: Can You Recover Emptied Trash on Mac?
Yes, in many cases, you can. But the outcome depends on several factors:
- Time elapsed since deletion: The less time, the better. Though the TRIM feature on SSDs and new data writes reduces the chance.
- Drive type (SSD vs HDD): HDDs give a longer recovery window. Whereas SSDs with TRIM are time-critical.
- Whether a backup exists: Time Machine or iCloud backup offers a near-certain full recovery.
- Mac chip type: Apple Silicon (M1–M4) Macs use hardware encryption. So, not all tools can scan them.
- Disk activity since deletion: Heavy use (downloads, installs, browsing) reduces recovery odds.
Important Info: One immediate action you can take before doing anything else. If you just emptied the Trash in the same Finder session, try “Command + Z” (Undo). This only works within seconds of emptying and won’t work once you’ve navigated away. But if it’s available, it’s the fastest possible fix.
Part 3: How to Recover Emptied Trash on Mac (Step-by-Step)
Here are 4 methods to recover an emptied Trash on Mac for different situations, with step-by-step instructions:
Method 1: Restore from Time Machine Backup
Time Machine is macOS’s built-in backup tool. If it was already running before the files were deleted, it offers the easiest way to recover Trash from Mac. You can get your files back with their original names, folder structure, and details preserved. However, if it wasn’t set up, you’ll need to move on to Method 3. Here’s how to restore files from a Time Machine backup:
Step 1: Connect your Time Machine backup drive (external HDD or NAS) to your computer. Step 2: Open “Finder.” Move to the folder where the deleted files were stored.
Step 3: Click the “Time Machine” icon in the menu bar. Then, select “Enter Time Machine.”
Step 4: Use the timeline on the right side of the screen to travel back to a point before the deletion.
Step 5: Select the files or folders you want to restore. Click “Restore.” macOS will place them back in their original location.
Pro Tip: If you deleted files from a specific location (like your Desktop or Documents), move there first before entering Time Machine. The interface shows that folder’s history, making it easier to find exactly what you lost.
Method 2: Check Cloud Storage (iCloud/Drive)
If the deleted files were in an iCloud-synced folder like Desktop, Documents, or iCloud Drive, they may still be recoverable from iCloud’s “Recently Deleted” area. This method is best for files that were stored in synced cloud folders before they were deleted. Here’s how to recover deleted files from Mac Trash with cloud storage:
For iCloud Drive:
Step 1: Head to “icloud.com” in a browser and sign in. Click the grid icon and open “iCloud Drive.”
Step 2: Look for a “Recently Deleted” folder. iCloud keeps deleted files here for up to 30 days. Step 3: Select the files. Click “Recover.”
For other cloud services:
- Google Drive: Head to drive.google.com → Trash (left sidebar) → right-click files → Restore.
- Dropbox: Log into dropbox.com → Deleted files → Restore (available for 30–180 days depending on your plan).
- OneDrive: Head to onedrive.live.com → Recycle Bin → Restore.
Method 3: Recover Emptied Trash Using Data Recovery Software (Most Effective)
When no backup exists, a dedicated software like 4DDiG Mac Data Recovery gives you the highest chance of success. It can recover permanently deleted files on Mac from internal HDDs, SSDs, or external drives, and anyone dealing with a mix of file types. The tool also supports Apple Silicon (M1–M4) chips.
Main Features of 4DDiG:
- Recovers 2,000+ types of data from Mac or Mac-based devices and is fully compatible with macOS Tahoe.
- Supports both APFS and HFS+ file systems, so it can recover data from most Mac internal and external drives, including encrypted ones.
- Includes a backup option that makes a full, exact copy of a drive before recovery (useful for creating a safe image of the disk).
- Provides Quick Scan and Deep Scan options, lets you recover selected files, and allows previewing files for free before restoring them.
- Simple three-step process accessible to users without technical experience.
Step-By-Step Guide to Use 4DDiG:
Here’s how to employ 4DDiG to retrieve deleted files from your Mac’s Trash:
Step 1: Install 4DDiG
Download 4DDiG from the official Tenorshare website, and install it on your computer.
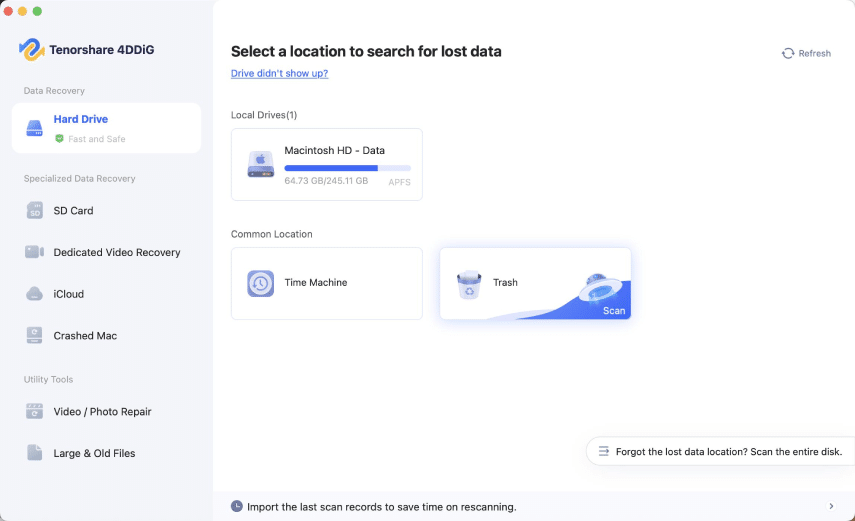
Step 2: Choose the drive to scan
Open 4DDiG and select “Trash” from the interface. You can also filter by file type, like photos, videos, or documents.
Step 3: Start the scan
Click Start to run a Quick Scan first, followed by a Deep Scan for harder-to-find files. You can pause anytime and check results by file type or path, and enter keywords to search for exact files.
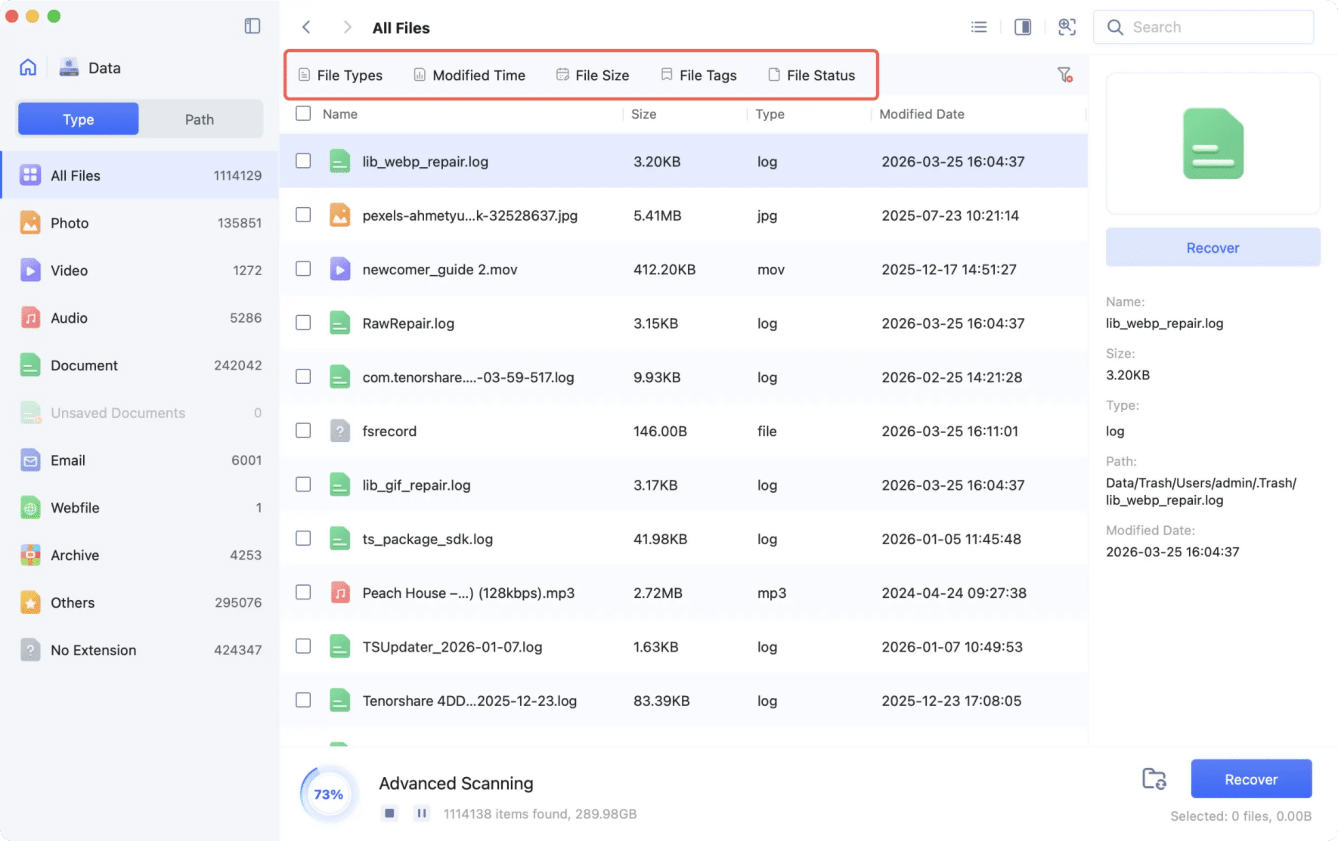
Step 4: Preview and recover
Preview files to make sure they’re correct, then select and recover them. Save the recovered files to a different drive to avoid overwriting data.
Method 4: Try Terminal (Limited Use)
The Terminal might also find leftover data. But in reality, it rarely restores usable files once the Trash is emptied, especially on modern APFS SSDs, where TRIM has already wiped the data. Terminal recovery is only sometimes useful on older HDD-based Macs (2016 or earlier), and even then, it’s unreliable. But there’s no harm in trying. So, here’s how to restore emptied Trash on Mac:
Step 1: Press “Cmd + Space,” and type “Terminal.” Hit “Return” to open the Unix shell.
Step 2: Type “cd ~/.Trash.” Press “Return” to go to the Trash folder.
Step 3: Use “mv filename ../ (replace filename with the actual file name).” Hit “Return” to move the file out of Trash.
Step 4: Type “exit” or close Terminal to quit, then open “Finder.”
Step 5: In Finder search, type the deleted file name. Hit “Return,” and drag the file to a safe location when it appears.
Part 4: How to Prevent Data Loss on Mac
Mac Trash Recovery might not always be successful. But taking some concrete measures, the following can prevent most data loss scenarios before they start:
- Examine if Time Machine is functioning: Go to System Settings → General → Time Machine and confirm the last backup date. If it hasn’t updated in weeks or months, the backup may not be working properly.
- Check Trash auto-delete setting: Open Finder → Settings → Advanced and see if “Remove items from the Trash after 30 days” is turned on. This could explain missing files if you didn’t manually empty the Trash.
- Be careful before emptying Trash: macOS doesn’t easily undo emptied Trash, so quickly check what’s inside before clicking “Empty Trash,” as many accidental deletions happen by habit.
- Use backups for important files: Don’t rely on a single backup. Follow the 3-2-1 rule: keep 3 copies of your data, on 2 different storage types, with 1 copy stored offsite or in the cloud.
- External drive caution: Deleted files from external drives go to a hidden “.Trashes” folder on that drive, not your Mac’s Trash. Don’t disconnect the drive until you’ve checked and recovered what you need.
Final Words
You can recover emptied Trash on a Mac in many cases. But it depends on how quickly you act, whether a backup exists, and the type of storage your Mac uses. Time Machine and iCloud offer the easiest and most complete recovery if they were set up earlier.
But if no backup is available, employ a dedicated recovery tool like 4DDiG Mac Data Recovery, offering high success. It can retrieve permanently erased files from both internal and external storage, allows selective file recovery, and provides a preview of recovered files.
FAQs
Q1: Can I recover files after emptying Trash on Mac?
Yes, in many cases. When you empty the Trash on macOS, the file itself is removed from view, but the actual data often stays on the disk until it gets overwritten. Recovery works best if you act quickly. Stop using the Mac, and try restoring from backups like Time Machine or iCloud, or use retrieval tools, such as 4DDiG Mac Data Recovery.
Q2: Where do files go after Trash is emptied on Mac?
The files are removed from the system’s index, but their actual data can still stay on the storage drive. On HDDs, this data may remain for a while. But on modern Macs with SSDs and TRIM enabled, the deleted data can be erased within minutes to hours, making recovery impossible after that.
Q3: What is the best way to recover permanently deleted files on Mac?
If you have a backup (Time Machine or iCloud), restore from it first since it’s the quickest and most complete way to get your files back. But if no backup exists, use a recovery tool like 4DDiG Mac Data Recovery, which can scan your drive directly and offers a higher chance of retrieving permanently deleted data.
Q4: Can Time Machine recover emptied Trash files?
Yes, if the files were backed up before deletion. You can open Time Machine, go to the folder where the files were stored, and scroll back to a time when they were still there. Click “Restore” to recover them.
Q5: How long are deleted files recoverable on Mac?
Not always. Recovery depends on speed because TRIM runs in the background and can permanently erase deleted data within minutes to hours on modern Macs. If you act quickly before TRIM clears those blocks, recovery tools may still be able to find the files. But the longer you keep using the Mac, the lower the chances are for retrieval.