If you like the precision of AirTag but don’t want to buy a tag, ultra‑wideband is the magic sauce. That’s when I tried an Arduino‑friendly Raspberry Pi alternative (tiny, by comparison): the iLabs Challenger RP2040 UWB. Using some ideas from a friend, I built a compact UWB tracker capable of finding items with near‑AirTag accuracy. Here’s how it works, what the hardware can and cannot do, and where a Do‑It‑Yourself solution excels or falls short.
Why choose UWB instead of off‑the‑shelf Bluetooth tags
Ultra‑wideband (UWB) uses time‑of‑flight between radios to provide distance readings down to about 10 centimeters, much more accurate than the ballpark proximity of Bluetooth. This is all based on the new in IEEE 802.15.4z standard, with its security and ranging features being spearheaded by the FiRa Consortium leaders. Apple’s U1/U2 chips, more recent Android flagships, and professional RTLS systems all rely on this tech for accurate finding.
- Why choose UWB instead of off‑the‑shelf Bluetooth tags
- The core hardware and how much the build costs
- How I built it, step by step, from setup to testing
- What this DIY UWB tracker can do—and where it fails
- Security, privacy, and compliance considerations
- Key takeaways and practical next steps for builders
Commercial tags hop massive crowdsourced networks to obtain location updates. A DIY UWB tag isn’t going to be a member of those networks, but it puts you in the driver’s seat for control and fine‑grained ranging, and allows you freedom to optimize power consumption, features that could flow through at 375 kbps or less, all suited to your site or project.
The core hardware and how much the build costs
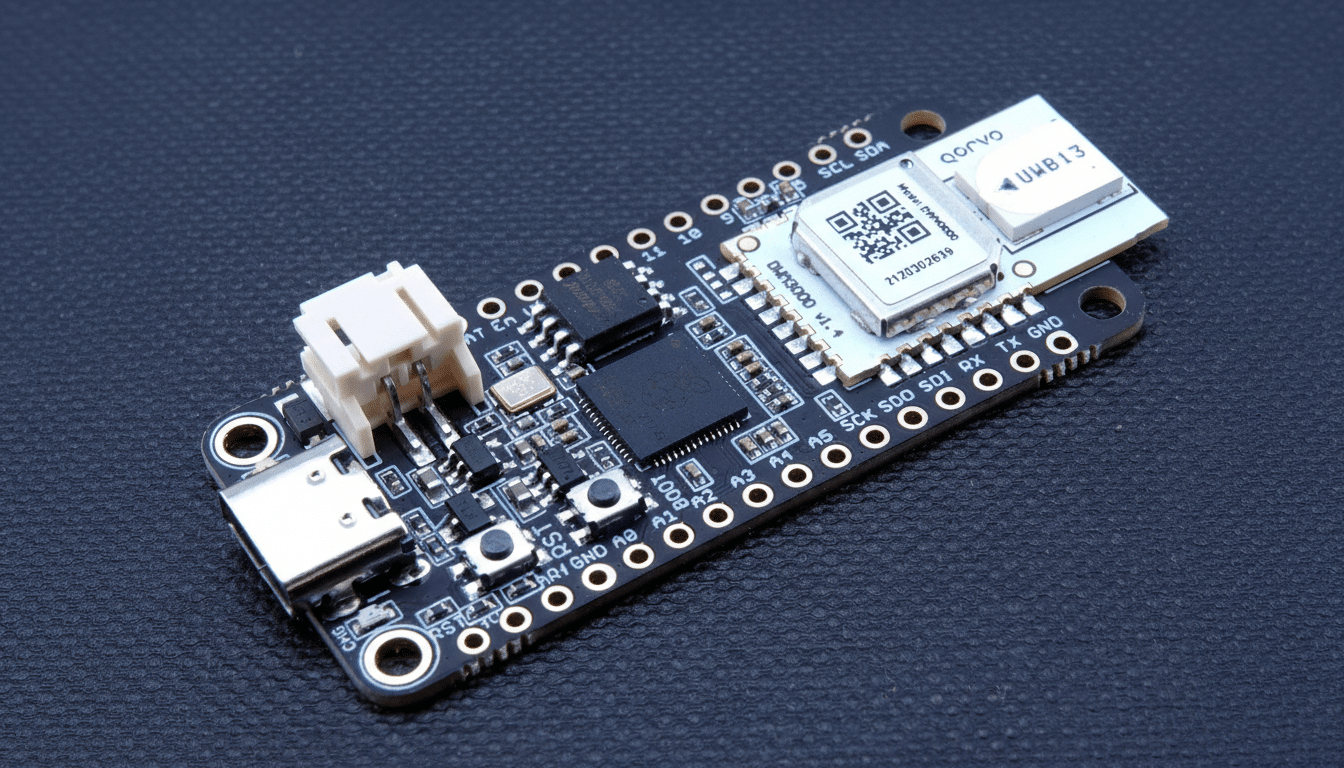
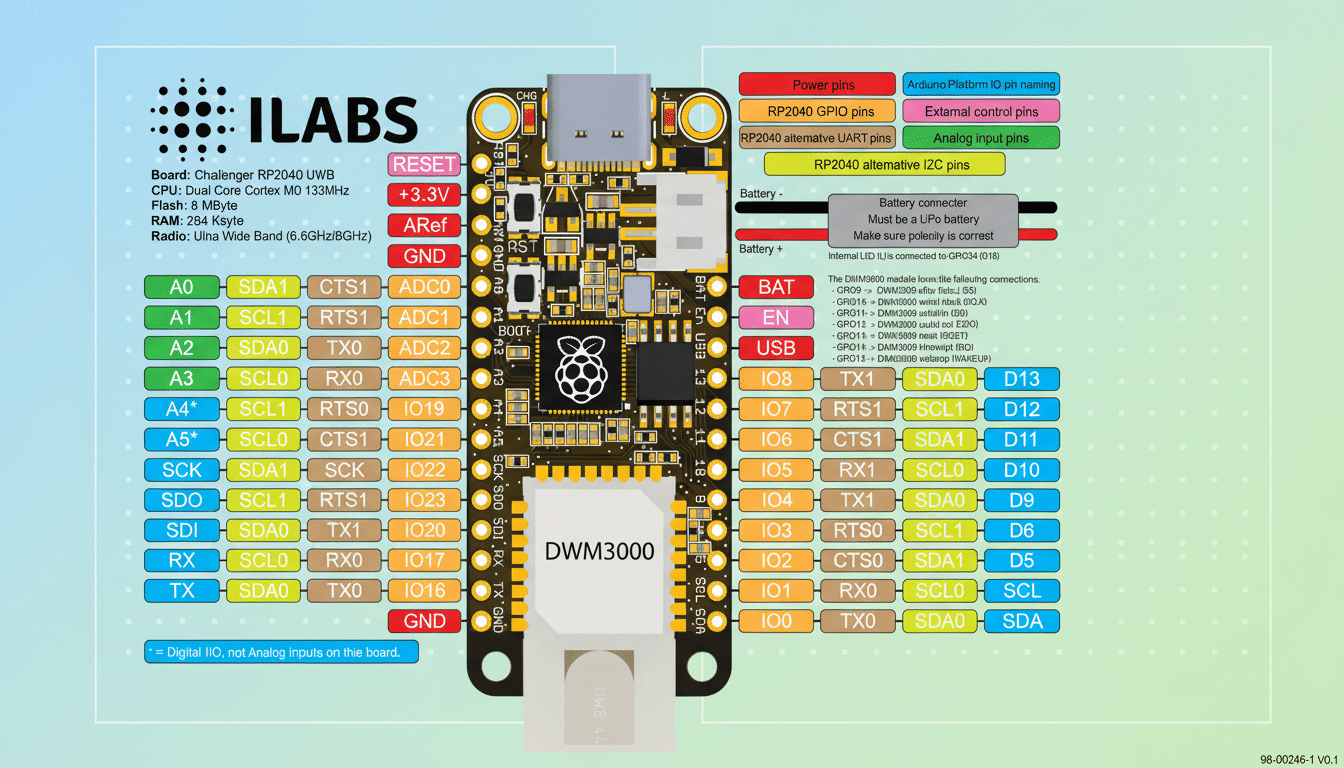
At the heart of my build is the iLabs Challenger RP2040 UWB: an Adafruit Feather‑format board that combines Raspberry Pi’s Pico‑class RP2040 microcontroller with the Qorvo/Decawave DWM3000 ultra‑wideband (UWB) module. Look for 8 MB flash, 264 KB RAM, USB‑C programming, and LiPo battery support with on‑board charging.
Each board costs roughly $65 to $75. You want at least two: one “tag” and one “anchor.” So three anchors enable trilateration for room‑level placement. Supply a little LiPo (500–1000 mAh), JST cable, and enclosure housing. Since the RP2040 has no Wi‑Fi or BLE, I would use an external Feather‑compatible ESP32 board as a gateway when cloud logging is desired.
How I built it, step by step, from setup to testing
- Getting started with the toolchain: I downloaded and installed the Arduino IDE, added the RP2040 board support package along with the iLabs DWM3000 libraries and examples. If you’ve flashed a Pico or Feather in the past, this format will seem familiar.
- Basic ranging flash: Using one board as an immobile anchor and another running as a tag, I loaded a two‑way ranging sketch. The tag pings; the anchor answers; the time‑of‑flight gives us a distance. I matched UWB channel, data rate, preamble length, and security to FiRa defaults in order to get reliable results.
- Calibration for accuracy: I measured a known 1‑meter distance and adjusted the antenna delay such that the meter reading matched reality. This one intervention alone had the effect of shifting results throughout its recessional sweep. In my shop I consistently saw 0.1–0.2 m error, which is in line with DWM3000 claims and FiRa recommendations for NLOS environments.
- Scale to room tracking: Two more anchors went up with known coordinates. The tag reported the distance to each anchor over serial; a small Python script on the gateway solved for the 2D trilateration using least‑squares fit. In a clean space, the estimates hovered at some 15–30 cm. Crowded metal shelving increased that to ~40–60 cm, a pervasive UWB multipath effect described in industry white papers.
- Add power management: The active UWB consumes ~75 mA in this configuration; sleep mode draws ~1.5 µA. I programmed the tag to wake every 2 seconds, perform a lightweight ranging burst, and return to sleep. For a 750 mAh cell and an approximate duty cycle of 1%, the average current centered around just under 0.8 mA, yielding on the order of a month‑long runtime. At a higher ping rate that gets cut dramatically, so if all else fails make sure to size your battery for the update interval.
- Box and label: I tucked the tag into a small 3D‑printed case alongside an on‑off switch and piezo buzzer. The anchors were placed in housings mounted to the walls with USB power. Having the same height and good visibility affected accuracy the most.
What this DIY UWB tracker can do—and where it fails
This build will give you accurate distance and, with a sufficient number of anchors, room‑scale coordinates. It doesn’t participate in Apple’s Find My network or Android’s crowdsourced equivalents; those programs have certain certifications and contracts that are necessary to join. The DWM3000 can interoperate at the radio level with U1/U2 and FiRa devices, but user‑facing “find” features reside behind platform frameworks.
Where it shines is tracking stuff you’ve configured yourself: tools in a shop, loaner kits at a lab, or temporary installs on a site. For a live map I shunted data via MQTT into Home Assistant, and the UWB readings were a lot more stable than BLE RSSI (particularly when people moved through).
Security, privacy, and compliance considerations
IEEE 802.15.4z adds secured ranging with cryptographic STS, which I turned on to protect against replay. Don’t log keys to the device’s public logs, and don’t broadcast identifiers. It’s also best to pay attention to unwanted‑tracking guidance from platform makers; Apple and Google released a joint specification about how phones alert people when they find known trackers. A DIY UWB tag won’t automatically invoke those protections, so use it responsibly and with consent.
On the regulation side, stick to certified modules and region‑specific channel and power. The DWM3000 module has approvals in common worldwide UWB allocations, and vendors offer app notes on antenna location and emissions to keep projects within Part 15.
Key takeaways and practical next steps for builders
For anyone able to get comfortable with Arduino and basic electronics, this Raspberry Pi–caliber alternative would be a thoroughly believable, precise tracker. Allocate about $200 for a tag and a pair of anchors, and weekend‑level effort from first flash to usable ranging. For production usage I’d include an ESP32 co‑pro for Wi‑Fi/BLE, a better battery gauge, and a slick web UI for anchor placement and calibration.
For teams that want control, privacy, and even sub‑meter accuracy with no subscription fees, UWB on the Challenger RP2040 is a realistic and attainable route — as well as being an arrow between the eyes of margin‑extracting suppliers, showing that AirTag‑like precision isn’t magic, but rather good radio engineering put into practice.