Now, Linux and Mac users have a single, free tool to offer the same simple way of installing and managing software from the command line. It’s called Homebrew, and if you’re switching between operating systems — or simply want a tidier installation process that isn’t fringed with cruft — it offers the easiest route to a consistent app workflow on either platform.
What Homebrew Is, and Why It's So Great
Homebrew is a free and open-source software package manager that automatically downloads, compiles, and installs software. Think of it as a lightweight, command-line app store with thousands of community-maintained packages (formulæ) and Mac-only “casks” for desktop apps. Developers like it because it provides reproducible installs, clean upgrades, and uninstalls that do not require hunting down old downloads or wrestling with new dependencies.
- What Homebrew Is, and Why It's So Great
- How to Install Homebrew on macOS and Verify Setup
- How to Install Homebrew on Linux and Configure Your Shell
- Day-to-Day Commands You’ll Actually Use for Homebrew
- Why Developers and IT Teams Love Homebrew
- Limitations and Best Practices for Using Homebrew
- Bottom line: What Homebrew Gives macOS and Linux Users
The project is actively supported on GitHub by a vibrant contributor community and supports all major versions of Intel and Apple Silicon Macs, as well as popular Linux distributions. For teams, a uniform tool across OSes saves onboarding time and prevents drift in developer environments. For people, it’s just much faster and less error-prone than manual installs.
How to Install Homebrew on macOS and Verify Setup
First, install Apple’s Command Line Tools by executing xcode-select --install in the Terminal. This provides compilers and headers some packages require.
Then, launch Homebrew’s official installer inside the Terminal: /bin/bash -c "$(curl -fsSL https://raw.githubusercontent.com/Homebrew/install/HEAD/install.sh)" and follow its instructions, including entering your password when prompted.
Once the script has completed, load Homebrew into your shell by running the following command. For use with Apple Silicon, execute: eval "$(/opt/homebrew/bin/brew shellenv)". (On Intel Macs, replace /opt/homebrew/bin/brew with /usr/local/bin/brew in the command above.) Add a line like this to your shell startup file (for example, ~/.zprofile or ~/.bash_profile) so that it is defined across sessions.
Check your setup with brew doctor. If it finds any problems, follow the recommended remedies.
How to Install Homebrew on Linux and Configure Your Shell
First install basic build tools and curl. On Debian/Ubuntu: sudo apt update && sudo apt install -y build-essential curl file git. On Fedora/RHEL: sudo dnf groupinstall -y "Development Tools" && sudo dnf install -y curl file git. On Arch: sudo pacman -S --needed base-devel curl git.
Run the installer: /bin/bash -c "$(curl -fsSL https://raw.githubusercontent.com/Homebrew/install/HEAD/install.sh)". Then you need to add it to your shell: eval "$(/home/linuxbrew/.linuxbrew/bin/brew shellenv)". Append that line to your ~/.profile or shell config if you want to make it permanent.
Confirm with brew doctor. If you’re on a slim server, you will probably need some extra libraries to be installed depending on what you install; Homebrew should warn if anything is missing.
Day-to-Day Commands You’ll Actually Use for Homebrew
- Search for packages:
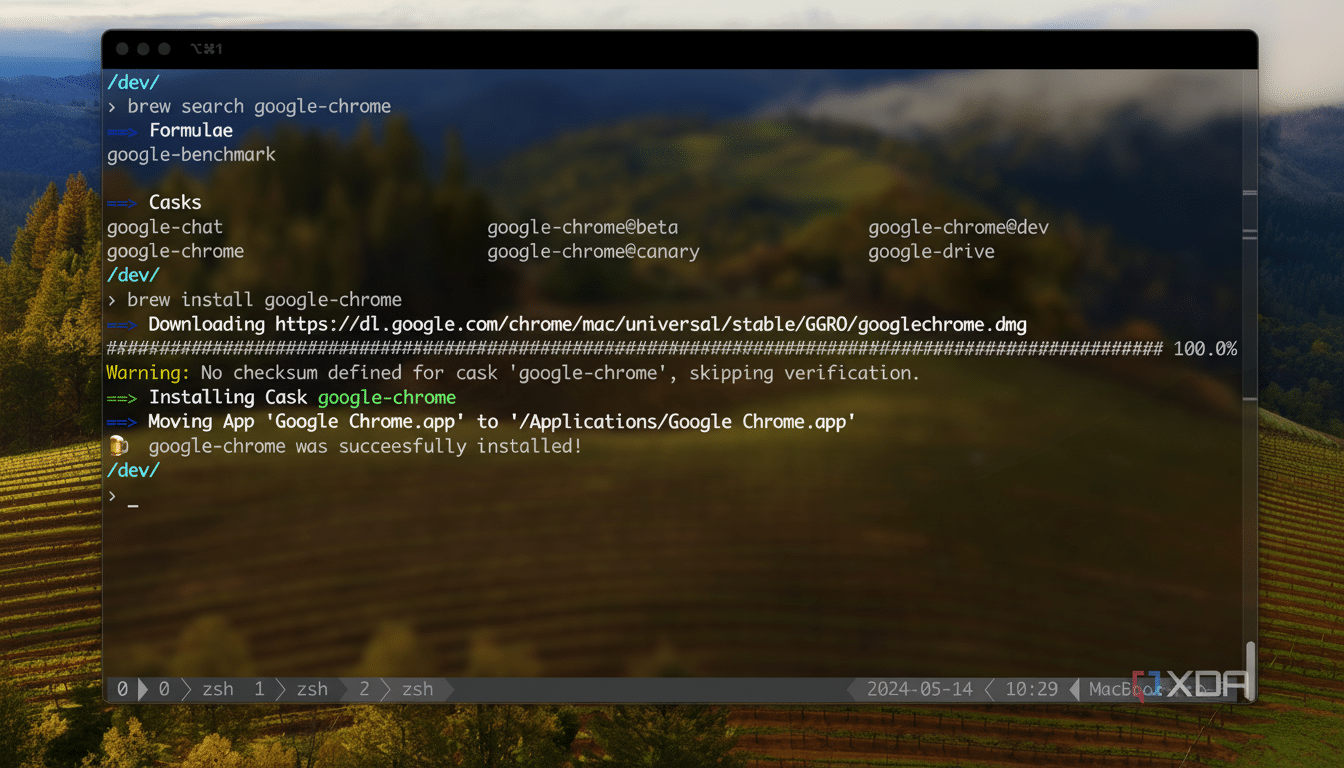
brew search node - See details:
brew info node - Install software:
brew install node - Update what’s old:
brew update && brew upgrade - Uninstall packages you no longer need:
brew uninstall node - Clean up old versions and caches:
brew cleanup
On a Mac, Homebrew also has its own mechanism for desktop applications, and that’s casks. For example: brew install --cask firefox installs the full GUI browser, along with your CLI tools. It is worth noting that casks are macOS only — on Linux you’ll be using native app stores, Flatpak, or otherwise GUI-focused channels for desktop apps.
To quickly re-create an environment, you can use Brewfiles. Invoke brew bundle dump to generate a Brewfile from your current machine, commit that, and on a new Mac or Linux box run brew bundle to install all the things in one fell swoop. This is the preferred option for teams when the goal is to express a setup scenario in a reproducible way.
Why Developers and IT Teams Love Homebrew
The big wins are speed and consistency. The “bottles” (prebuilt binaries) system Homebrew uses installs faster than building from source, and its dependency resolution is mature. The Stack Overflow Developer Survey has consistently reported that the command line is your friend, and Homebrew aligns perfectly with this paradigm by making standard setup a few easy commands.
The project’s public analytics reveal perennial favorites including wget, openssl, git, python, and node at the top of the installed package list—familiar tooling likely to be needed by most developers. The official core hosts thousands of formulae, and the community taps many more, so chances are high you’ll find what you want without slow manual downloads.
Limitations and Best Practices for Using Homebrew
- Retain your system’s native package manager for OS-level packages and drivers. Use Homebrew for user-space tools and developer stacks.
- Linux’s GUI app selection via Homebrew is slim; supplement with Flatpak, Snap, or your distro’s repos as needed.
- Run
brew update,brew upgrade, andbrew cleanupregularly to keep up to date and clean. If something on your system seems wrong,brew doctoris the first command you should run. - Pin versions for teams in your Brewfile to prevent unexpected upgrades during important work, and document any taps you’ve added beyond
homebrew/core.
Bottom line: What Homebrew Gives macOS and Linux Users
Ever wanted a Linux-style package manager on your Mac? Homebrew is it. It’s free, fast, and predictable—just what you want in a package manager—and it turns spinning up a new machine for an afternoon project into something that fits in your coffee break.