Nmap is a defenders’ favorite, and for good reason. This Python-based tool can be run on any Linux box and provides a no-nonsense summary of what’s plugged into your network, which services are exposed, and where misconfigurations lurk to boot. It’s free, comes prepackaged on many distributions, and is trusted by incident responders and penetration testers.
Government and world community standards mandate ongoing scanning. NIST’s advice on security testing focuses on host discovery and service enumeration, while CISA often advises organizations to minimize externally exposed services. Here are five specific ways to get Nmap cranking on hardening your environment—along with which flags to use and what the results will tell you.

Quickly identify every live host on your network
Missing assets are a common thread in breach inquiries. Begin by mapping what is actually on your network. A ping/ARP sweep with Nmap finds all active devices in a hurry: nmap -sn 192.168.1.0/24 for IPv4 ranges, or tack on -6 for its IPv6 counterpart. On the local LAN, Nmap also uses ARP to locate and count hosts even if they’re blocking ICMP echo.
Make discovery commonplace, not a one-time event.
Save results with -oN or -oX and diff the runs to catch rogue devices or shadow IT gear that only shows up post-project sprint or contractor visit. SANS instructors will commonly suggest scanning from three different vantage points—core, branch, and VPN—to ensure you catch any assets that are obscured by NAT or VLAN-conflation.
Discussing Open Ports and Unexpected Services
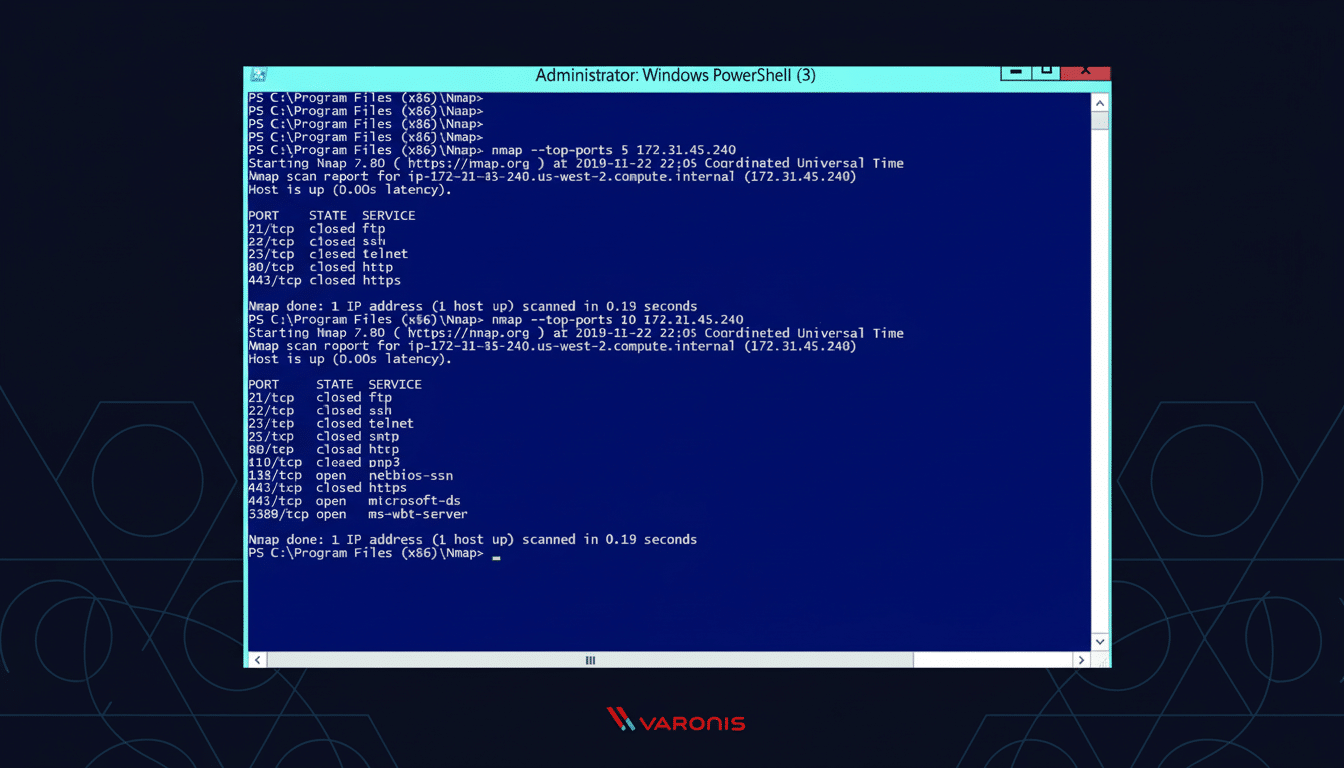
“The way most compromises start is with an accessible service or a basic misconfiguration, and that’s true enough times that it will show up in the Verizon Data Breach Investigations Report year after year,” said Hudson. Nmap’s SYN scan is the workhorse to track them down: try nmap -sS -p- 10.0.0.15 for full TCP coverage or nmap –top-ports 1000 10.0.0.0/24 for a quick sweep of a subnet. Include UDP when it’s relevant (DNS, NTP, SNMP) with nmap -sU against a small subset of targets to keep scans bearable.
What to look for? High-risk services exposed (SMB on 445, RDP on 3389, databases on 1433/3306), outdated protocols configured (Telnet or FTP), and “test” services left behind that no one remembered to turn off. If only one risk factor concerns you, target your query: nmap -p 25 10.0.0.0/24 just as quickly identifies SMTP visibility leaks that will allow spam relaying or basic inside-your-network phishing campaigns.
Learn What Software Versions are in Place and What Problems They Have
If you know a port is open, that’s step one; knowing what’s behind the unwelcome door drives actual remediation.
Add nmap -sV service detection for fingerprinting and banner information. If you need to get rigorous, you can up the ante with –version-intensity 7 when precision is more important than processing speed. This turns a list of ports into things you can go ahead and patch: OpenSSH 7.2p2 on an edge host, Apache httpd 2.4.29 on a business-critical app server, or that old RPC service which should have been decommissioned by now.
For triage, Nmap’s script engine can identify common weaknesses without trying exploits. Begin with nmap -sV –script=vuln target to find out about known problems associated with CVEs. Prioritize based on results compared against the CISA Known Exploited Vulnerabilities list and your own vendor advisories. The intention isn’t to break stuff — it’s to rapidly get exposed, outdated software into your patching workflow.
Verify network traffic paths and firewall rulesets
Attacks aren’t stopped by paper rules — they are stopped by controls. Nmap helps you confirm that those ACLs and microsegmentation are working as expected. Perform front, rear, and lateral scans. Compare multiple scans from the front to the user VLAN, database tier, and jump host. Use nmap -Pn (do not perform host discovery) when ping is not permitted, and try an ACK scan (nmap -sA) to distinguish “filtered” from “unfiltered” traffic. If a service is showing as open from the wrong zone and it’s not supposed to be, you’ve just found yourself a policy gap that should probably be rectified at once.
Export results to files and store with change records: nmap -sS -p 443,5432 -oN db_policy_check.txt db-subnet. Once you’ve updated the firewall, rescan everything in exactly the same way and check that access hasn’t slid elsewhere. This kind of objective verification aids in meeting audit requirements and avoids guesswork during incident response.
Create Baselines and Automate Change Detection
Hardening is a process, not the project. Create baseline “known-good” service maps for important hosts with nmap -sS -sV -oX baseline.xml host1 and then make a cron job to do some regular scanning. Track deltas with flat diffs or plug the XML/greppable output into your asset-tracking database. The main attack vector will be its (automatic) updates and the computer environment (other software installed or local services compromised).
Continuous monitoring is consistent with NIST’s guidelines for continuous assessment and is a natural complement to configuration management. With larger environments, tune performance with -T3 or -T4 and scope your scans intelligently to prevent needless load. If you need larger-scale exposure of such exposures, match up targeted Nmap sweeps to network telemetry (or from an internet-facing inventory service like Shodan), because who knows when devices get popped; and with full knowledge that adversaries are nowhere close to actually making this kind of information useful.
One last warning: Get explicit permission before scanning any network or host not under your ownership. Used responsibly, Nmap can help you to discover assets, reduce attack surface (as mentioned in 6 of the CIS security controls), verify device security consistency in compliance with your policies, and demonstrate value against these objectives.